Wi-Fi on a Mac not functioning? The Wi-Fi on my MacBook won’t connect. Here are some instructions for fixing Wi-Fi problems on your Mac and what to do if you can’t connect to the Wi-Fi network.
Welcome to our Mac Wi-Fi troubleshooting page, which provides solutions for issues including Wi-Fi not working, a Mac that won’t connect to the internet, a MacBook that won’t connect to Wi-Fi but other devices will, and weak wireless signal.
There are three main causes of Wi-Fi outages: a broken router, a network outage at your broadband provider, or a problem with your personal Wi-Fi network. Less frequently, there can be a problem with the macOS application you’re using. In this post, we discuss each of these situations.
The following suggestions for resolving Mac WiFi difficulties are covered in this article:
- Look for software problems
- Check the macOS Wi-Fi suggestions to see if your internet provider is experiencing any troubles.
- Restart the router.
- Reboot your Mac
- Turn off Bluetooth, “forget,” and then re-connect to your network.
- Make sure your router is comfortable, look at its surroundings, and make sure nothing is in the way of the signal.
- Utilize the Apple Wireless Diagnostics
- Consider using the 5GHz band, changing your Wi-Fi channel, and checking for the competition from other networks.
- Examine your security settings.
- activate Apple Diagnostics
- Reset your SMC, PRAM, or NVRAM, then modify your network’s DNS settings.
By selecting the aforementioned link, you can navigate to a guide for each of these steps, or you can simply read the instructions below in chronological order.
Look into Apple’s software
Look into Apple’s software.
Wi-Fi issues have occasionally occurred in the past when Mac customers updated their devices to a new version of macOS. With the first iteration of El Capitan (macOS 10.11), this was a significant problem in 2015: after the upgrade, many users discovered their Macs could no longer connect to their WiFi network.
Due to the lack of an Ethernet port in the MacBook Air, Apple released a software update, but this wasn’t an easy repair for users who could only access the internet via Wi-Fi (unless they had an adapter). When this issue arose, we had to update our Mac to the most recent version of macOS while simultaneously sharing an internet connection from a mobile device.
If you need a software update, you could have to do the same. In such a case, be careful not to use up all of your data plan’s allotment! (Read our advice on how to use all of the data on your iPhone here.)
If you are using a beta version of macOS, Wi-Fi issues can also arise. For instance, when we were using the High Sierra beta, Wi-Fi frequently dropped.
View Apple’s Wi-Fi suggestions
macOS checks for problems when your Mac tries to connect to a Wi-Fi network. The Wi-Fi status menu, which you can get by clicking on the Wi-Fi emblem at the top right of your screen, will display suggestions if any are found. If you don’t see any suggestions here, Apple hasn’t discovered anything to alert you about (yet). Here, you may also find instructions on how to set up a router for a Mac or an iPhone.
Consult your Internet service provider
It isn’t much you can do if the issue is at the provider’s end other than the complaint, which you should do without a doubt.
Even if the network isn’t down, there could still be an issue with your phone connection or with your service provider. If your web connection frequently drops during inclement weather, for instance, it may be because water is getting into the house’s wiring.
To check if there is an issue with the connection to a website you are browsing, you might also want to perform a Ping test. Find out how to run Ping on a Mac here.
Restart the router
You should turn your router off and back on to see if that solves the issue. You must switch off your router for about 30 seconds, then plug it in and turn it back on to do a power cycle.
relaunch your Mac
Like with the router, it’s a good idea to restart your Mac as well.
Try restarting your computer if the problem persists. If so, force the Wi-Fi to check for networks once more by shutting it off, waiting a little while, and then turning it back on.
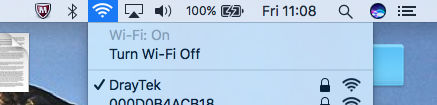
Select Switch Wi-Fi Off from the menu that appears when you click the Wi-Fi logo in the top right corner of your Mac to turn Wi-Fi on and off again.
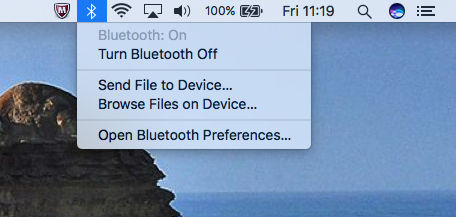
Cut Bluetooth off
Try turning off Bluetooth. This solution has proven effective for some people. The Bluetooth choices can be found in the Control Centre, which can be accessed by clicking on the switch symbol in the menu at the top of the screen if you are using a recent version of macOS.
You can disable Bluetooth by clicking on the appropriate icon.

If you are using an older version of macOS, select Turn Bluetooth Off by clicking the Bluetooth icon (the runic B next to the Wi-Fi icon) in the top right.
Set the network aside
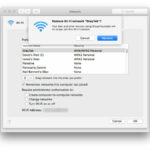
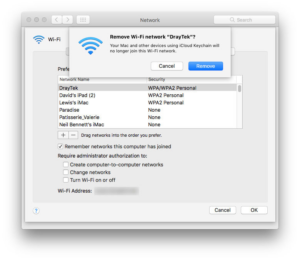
You could discover that making your gadget forget the network is beneficial. Turn off Airport, pick Wi-Fi from the selection on the left under Network in System Preferences, and then click Advanced. Choose the network you want to forget, hit (-), and then select Remove.
Your Mac and other devices using your iCloud Keychain won’t join that network once you’ve completed this.
Retain a cool router
If nothing changes, make sure your router isn’t overheated. Avoid covering it up or storing it somewhere without enough ventilation since if it becomes too hot, it won’t function as effectively.
Locate your router and look it up
Your router’s location is something else to verify. Avoid placing it on or close to any large metal surfaces to improve the signal. Avoid placing it next to a radiator or on top of a filing cabinet, for example.
Check to see if you can receive a signal by moving your laptop closer to your router. If it turns out that the signal is fine while you’re directly next to the router, it’s probably because of interference from something in your home or workplace.
Check to see if anything is obstructing the signal
There are many reasons why a location’s signal strength could be weaker than another. For instance, historic homes with strong walls may make it impossible to acquire a signal in a particular area.
It would be worthwhile investigating the building’s construction materials if there is a lot of metal present because this can also interfere with Wi-Fi.
To examine the Wi-Fi signal in your building, utilize the NetSpot app (free version; $49 for the Home version). To determine where the signal is stronger and where it is weaker, move your Mac around and chart the signal strength in several spots.
You may also try mesh WiFi, like the TP-Link Deco P9, which typically sells for less at Amazon and has an RRP of £149.99. The Linksys Velop AX4200, with an RRP of £219, is an option that is frequently on sale on Amazon. See our list of the top Mesh network routers.
Make sure to change the SSID (Wi-Fi name) and password of the new device when you set up the Wi-Fi extender so that it is the same as your current wireless router and modem. This will allow your Mac to choose the device that is providing the best connection without you having to switch and enter a new password.
Other electrical appliances including fans, motors, microwaves, and cellular phones could also be the cause of the issue.
Utilize the Apple Wireless Diagnostics
Using the built-in Wireless Diagnostics tool in macOS can also help you determine whether additional hardware is to blame for your signal loss.
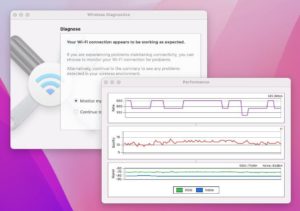
Use these steps to create a graph similar to the one above:
Use these steps to create a graph similar to the one above:
- Navigate to Wireless Diagnostics. Use Spotlight (Cmd + spacebar) to search for it by name, or hold Option or Alt while clicking the Wi-Fi symbol in the upper right corner of the screen and choosing Open Wireless Diagnostics.
- Before clicking Run Report to continue, select Window > Performance from the menu (or press Alt + Cmd + 5) on your keyboard.
Three graphs will be produced as a result, each showing the transmission rate, signal quality, and signal and noise levels. You might be able to determine if there is an issue if you watch this for a few hours.
The data rate of your wireless network is shown in Mbps on the top graph. The router you have connected to it and any other devices will determine the level of the graph. In terms of troubleshooting, it’s crucial that the rate is essentially constant. There is a problem if you see fluctuations in the data rate or a full drop-off.
The quality graph in the middle shows the signal-to-noise ratio over time. It ought to be a roughly straight line with little spikes. If you frequently see dips in the line, your Wi-Fi signal is probably being interfered with by something.
Try to pinpoint when and why any abrupt spikes in noise happen if you observe them. Does it occur, for instance, when using a wireless phone or when turning on a microwave? Move the router away from the device that’s disrupting the signal if you notice that a certain appliance is doing so.
Look at the competition
If you’re in a densely populated region, your Wi-Fi connection may also be deteriorating as a result of other networks that are using the same radio waves as you.
Try the WiFi Explorer app (£17.99) to learn more about the other traffic in your neighborhood.
You can use WiFi Explorer to find out about nearby networks. It offers a lot more details than what you would typically find in the list of networks that are accessible on your Mac, which you can access by clicking on the Wi-Fi icon in the menu bar.
Pick a distinctive network name
Now that you’ve seen a variety of Wi-Fi networks, be sure to give your network a distinctive name when configuring it to avoid conflicting with the names of other neighboring networks.
Alter the Wi-Fi channel
By switching channels, you could mitigate some of the rivalries from other Wi-Fi networks. There is 13 channels total, and all but 1 of them overlap with one another. If at all feasible, use a channel that is away from your neighbors’.
The automatic channel selection that routers perform well depends on the adjacent activity. However, if you use Wireless Diagnostics’ Scan tool from the Windows menu and find that your network is using the same channel as a nearby router, you might want to think about manually changing it.
Your router’s firmware will determine the actions you must take to change the channel. You must be aware of your router’s IP address in order to access its software.
Enter the IP address into the address bar of your browser after opening it, then hit Enter. This launches the router software. To change the channel, look up the information and log into your router.
But don’t just switch it to the next open channel. Channel frequencies overlap, therefore wideband routers use seven channels at once whereas narrowband routers use five. Therefore, if you manually switch channels, be careful to relocate at least five or seven channels away from the channel that your router is now using.
Utilize the 5GHz band
The 2.4GHz band is the subject of the channels already described. Switching to the 5GHz band may be another option to boost your Wi-Fi signal. Due to the absence of other household equipment, the 5GHz band provides greater bandwidth than the 2.4GHz range and is less prone to interference.
Switching to 5GHz in the UK won’t always solve your problem in the same way as it could in the US because there are some legal limits on this band governed by Ofcom. However, it’s still worth a shot.
Examine your security settings
Examine your security settings.
One piece of advice is to avoid hiding your network since, despite what it may seem like, doing so can compromise its security and reliability.
Use WPA2 Personal security instead if you want your network to be secure.
activate Apple Diagnostics
Use Apple Diagnostics to look for Wi-Fi or network faults if your Wi-Fi concerns are still unresolved
Follow these steps to do so:
- Take away all external devices (except the keyboard and screen).
- After turning off the Mac, restart it while holding down the D key.
- Choose your language when the screen prompts you to do so, and then observe as the progress bar shows that your Mac is being evaluated. Takes two to three minutes.
- Apple Diagnostics will offer fixes if issues are found.
Reset your NVRAM, PRAM, or SMC
Reset your NVRAM, PRAM, or SMC.
Try resetting the PRAM and SMC (System Management Controller). This method is described here: How to clear the NVRAM, PRAM, and SMC on your Mac.
Editors Recommended