
It is quite simple to recover previous versions of files, restore a Mac, or set up a new Mac using Apple’s Time Machine program. This is how.
Apple’s Time Machine software makes it incredibly simple to discover an older version of a document, recover a file that was accidentally deleted, transfer all of your settings, files, and folders to a new Mac, or restore your Mac from an earlier backup.
Here are instructions on how to restore from a Time Machine backup, recover files from your backup, use Time Machine to migrate to a new Mac, and more if you have one on hand.
Read this article to learn how to back up your Mac using Time Machine if you haven’t already done so. Additionally, you might find How to Back Up a Mac handy.
Restoring data from Time Machine
Not only can you use this to find an older version of a document you were working on two days or two months ago, but you can also use it for other purposes. Additionally, switching from one Mac to another is simple, especially if the previous Mac is no longer functional. This one can be used to go back to a previous version of macOS.
Below, we’ll examine numerous situations, including:
- How to use Migration Assistant to restore everything from your old Mac’s Time Machine backup to the new Mac.
- Using macOS Recovery, you can go back to an earlier version of your Mac if you have an issue with the current version of the operating system and wish to fix it, or become infected with malware (learn more about whether or not Macs get viruses), or need to reset your Mac because of a problem.
- Using this backup to start a Mac.
- How to use this to go back to a previous version of a document.
- How to go back to an earlier version of a document without a Time Machine.
How to restore data from a fresh Mac using Time Machine
To move all of your data, preferences, and settings from an old Mac to a new Mac. You can use Migration Assistant, a utility that comes with your new Mac, to make this procedure quite simple.
Naturally, you should make sure that you have a Time Machine backup of your old Mac before you start.
- How to go back to an earlier version of a document without a Time Machine.
- Connect your hard drive to your old Mac, enter System Preferences, and select Time Machine if you don’t have a recent backup. Select Now and Back Up. Watch as your outdated Mac makes its final backup. (This page contains instructions on using Time Machine for backups.)
- You can begin setting up your new Mac now that you have your Time Machine backup. Start your new Mac and attach your Time Machine backup disc.
- You can use the setup wizard to transfer your Time Machine backup to the new Mac if you haven’t already set up your new Mac.
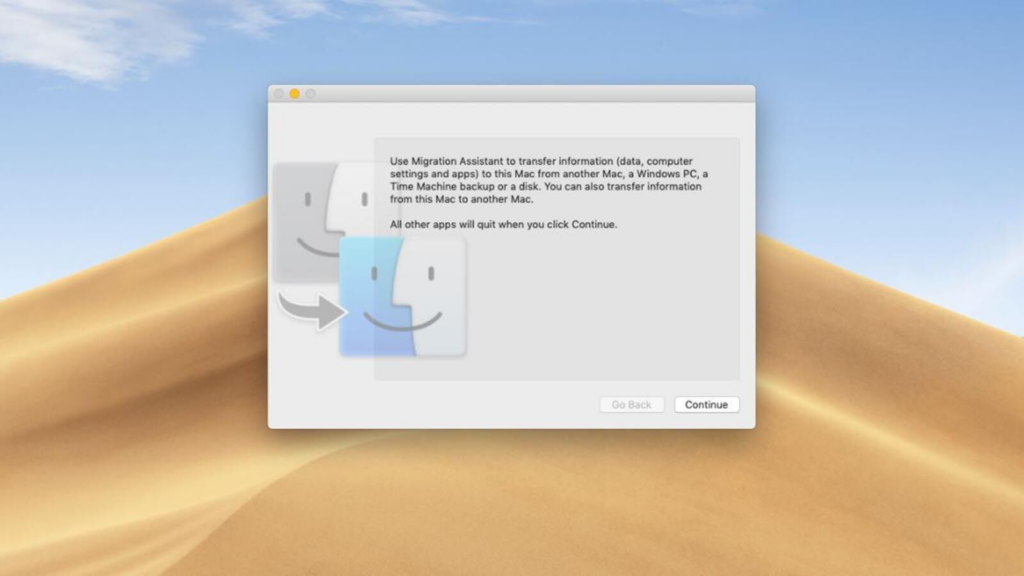
- Even if your new Mac has already been configured, you can still copy the Time Machine backup across. On your new Mac, start typing “Migration Assistant” by pressing space and command
- To confirm that you are happy for apps to terminate, click Continue in the Migration Assistant app.
7. Continue after selecting From A Mac, Time Machine Backup, or Startup Disk.
Make sure Time Machine is hooked into your new Mac before choosing your source. Select Continue.
8. Select the backup that you want to use (this will probably be your most recent unless you want to use an earlier backup)
9. Wait as the data is transferred to your new Mac
How to restore a backup on a Mac
You may want to restore your Mac to a previous time for a variety of reasons. When your Mac starts acting strangely, this is frequently the best course of action because it enables you to return to a point before everything started to go wrong. Here’s how to use Recovery mode to recover a Time Machine backup.
- As soon as your Mac has booted, press and hold Command + R.
- Hold both keys down until you see either the Apple logo or a rotating globe.
- Select Restore from Time Machine Backup and click Continue when you get the utility dialog.
- Once more, click Continue.
- Select a Time Machine backup made before the issues appeared, then select Continue.
If you have created anything since the backup you are recovering from, you should make a copy of it on an external disk because doing so will recover your old Mac over top of your current contents.
How to launch Time Machine from your Mac
Fortunately, you can restore from a Time Machine backup, which may come in handy if your system has a problem but you aren’t ready to restore it just yet or if you want to keep things distinct while using a new Mac operating system version.
How to inherit a Mac’s Time Machine backup (or not)
Although you can transfer the backup history from one Mac to another, you won’t be able to use the backup history with the original Mac after the new Mac inherits the backup history.
If you’re replacing an old Mac and want the new Mac to use the old backup files, this is OK. Therefore, select the Inherit Backup option.
When you connect your disk to the new Mac, pick Create New Backup if you intend to keep using your previous Mac. You can start new backups for the new Mac while preserving the history of previous backups in this way.
If you just need to go back to a previous version of a file you were working on, possibly because you deleted it by mistake or realized after making major edits that you had made a mistake. Fortunately, by following the instructions below, you can retrieve the previous version of that file. Depending on the program you are using (we’ll look at that case next), you might not even require an external Time Machine backup because your Mac will automatically back up local documents going back for some time.
Follow these procedures if you have a Time Machine backup:
- You can launch Time Machine by clicking on the icon in the menu bar and selecting Enter Time Machine, by using Spotlight by pressing Cmd+Spacebar and starting to type Time Machine, or by simply clicking on the Time Machine icon in your Dock if you have one.
- You can either use the up and down arrows on the screen to navigate to the individual files you want to restore.
- Once you’ve located the file, you may preview it by pressing the Space Bar to make sure it’s the one you need.
- To view or download a snapshot, click the Cloud symbol. When you do this, the snapshot will be viewable even if your external disk is not connected.
- If you wish to keep the new version of the document separate from the old one, cut and paste the relevant text instead of clicking Restore to restore the selected file.
How to view outdated files without using Time Machine
You might be able to restore from a recent Mac backup if your external disk is not nearby. You don’t even have to be using Time Machine, in fact.
For instance, do the steps below if you are using Pages to restore a previous version of a document:
- Click File from the menu while Pages is open and the most recent version of the document is open.
- select “Revert To”
- Simply select Browse all variations.
- Locate the desired version; our Mac had copies dating back four months.
- If you don’t want to replace the current version, cut and paste the information you need instead of clicking on Restore.
Even though non-Apple programs might not maintain “snapshots” in the same manner, if you have been performing Time Machine backups, you could still be able to view them even if your external disk is not connected:
- You can view some snapshots of your Mac if you launch Time Machine while it is not connected to the backup drive. For instance, you ought to be able to restore the previous version of the document you were working on when your Mac was backed up.
- If you’ve just taken your Mac away from the backup disk to bring it to a meeting and realized that the document you’re presenting is missing some information that was there earlier, this could be helpful.
FAQ
Can I use a Time Machine backup to restore Mac OS?
If your system or startup disk is destroyed, you can restore your files if you utilize Time Machine to back up your Mac. Prior to using your Time Machine backup to recover your files, you must first reinstall macOS on your Mac.
Why can’t I use Time Machine to restore my Mac?
Make sure your backup drive is linked directly to your Mac and not through a USB hub or other device unless you’re using a network backup disk. Use Disk Utility to fix the disk if your backup disk is directly linked to your Mac.
Where are Time Machine backups kept on a Mac?
Local snapshots are kept on the internal storage of your Mac notebook, whereas backups kept via Time Machine are kept on an external hard drive. Up until you run out of room, all backups are kept on your external hard drive going back years.
How come my Mac’s AutoRecovery folder is empty?
If you’ve enabled AutoRecovery in XL Preferences, you should normally only see an Autorecovery file if you’ve made changes to a workbook that has previously been SAVED while it was open for longer than the Autorecover duration. The changes from the most recent sav are stored in auto recover files
Editor’s recommended
Methods for Using Microsoft Edge’s Cache
How to backup a Mac with Time Machine